


Overthinking lines on a Rugby League field for several minutes

I, like most fans, assumed that a Rugby League field is fairly simple to construct; it’s mostly just a bunch of lines that are 10 metres away, right? But then I tried to plot a diagram of the field… it wasn’t as straightforward as I thought.
There are some interesting things to ponder, and even something I haven’t resolved myself. Let’s work through each step together.
Step 1: Grow grass in an appropriately sized area
Unfortunately, no guidance for this step will be provided in this article.

Step 2: Draw boundaries around a 100m x 68m rectangle
The international rulebook outlines that this is area is the “field of play” of a Rugby League field. The lines that bound this area are the try lines and touch lines.
It’s important to note that the lines are drawn on the outside of this area, so that try-line to try-line is exactly 100 metres, and touch line to touch line is exactly 68 metres. This makes a nice even total “field of play” area of 6800 metres squared.
For those that aren’t familiar with Rugby League, these lines are considered out of the playing field, so these distances are measured from the “inside” edges.
Let’s add the try and touch lines to our field of grass from step 1.

Step 3: Hold on, touch lines continue beyond the playing field though?
Yep, you’re right - we need to add the in-goal areas. Based on what I could find, a typical length of in-goal areas is 8 metres. However, this value can vary. We’ll use 8 metres here though.
To plot the dead ball lines, we’ll plot lines offset exactly 8 metres from the try lines, and it will all work out. Because all of the dead ball line is out and all of the try line is in the in-goal area, it will measure out to be exactly 8 metres in length.
For the area nerds out there, one in-goal area is 8m x 68m = 544 metres squared.
Here’s the in-goal area diagram (apologies if it appears blurry). It may not seem like a big deal, but the main takeaway is the start and ending position of the 8m arrow.

This is what the whole field looks like now:

Step 4: The meterage lines
The only obvious first move here is adding the 50m line, which simply must lie in the exact middle of the two try lines. Anything else would be quite a curious choice. This means that the exact middle of the field, is found at the middle of the line. Makes sense.
The main conundrum we face is the placement of the other 8 lines. Lines obviously have width themselves and must be accounted for.
Let’s look at the 40m line for an example. Each white rectangle shows an option of where we could paint the 40m line relative to the actual, infinitely small 40m mark.
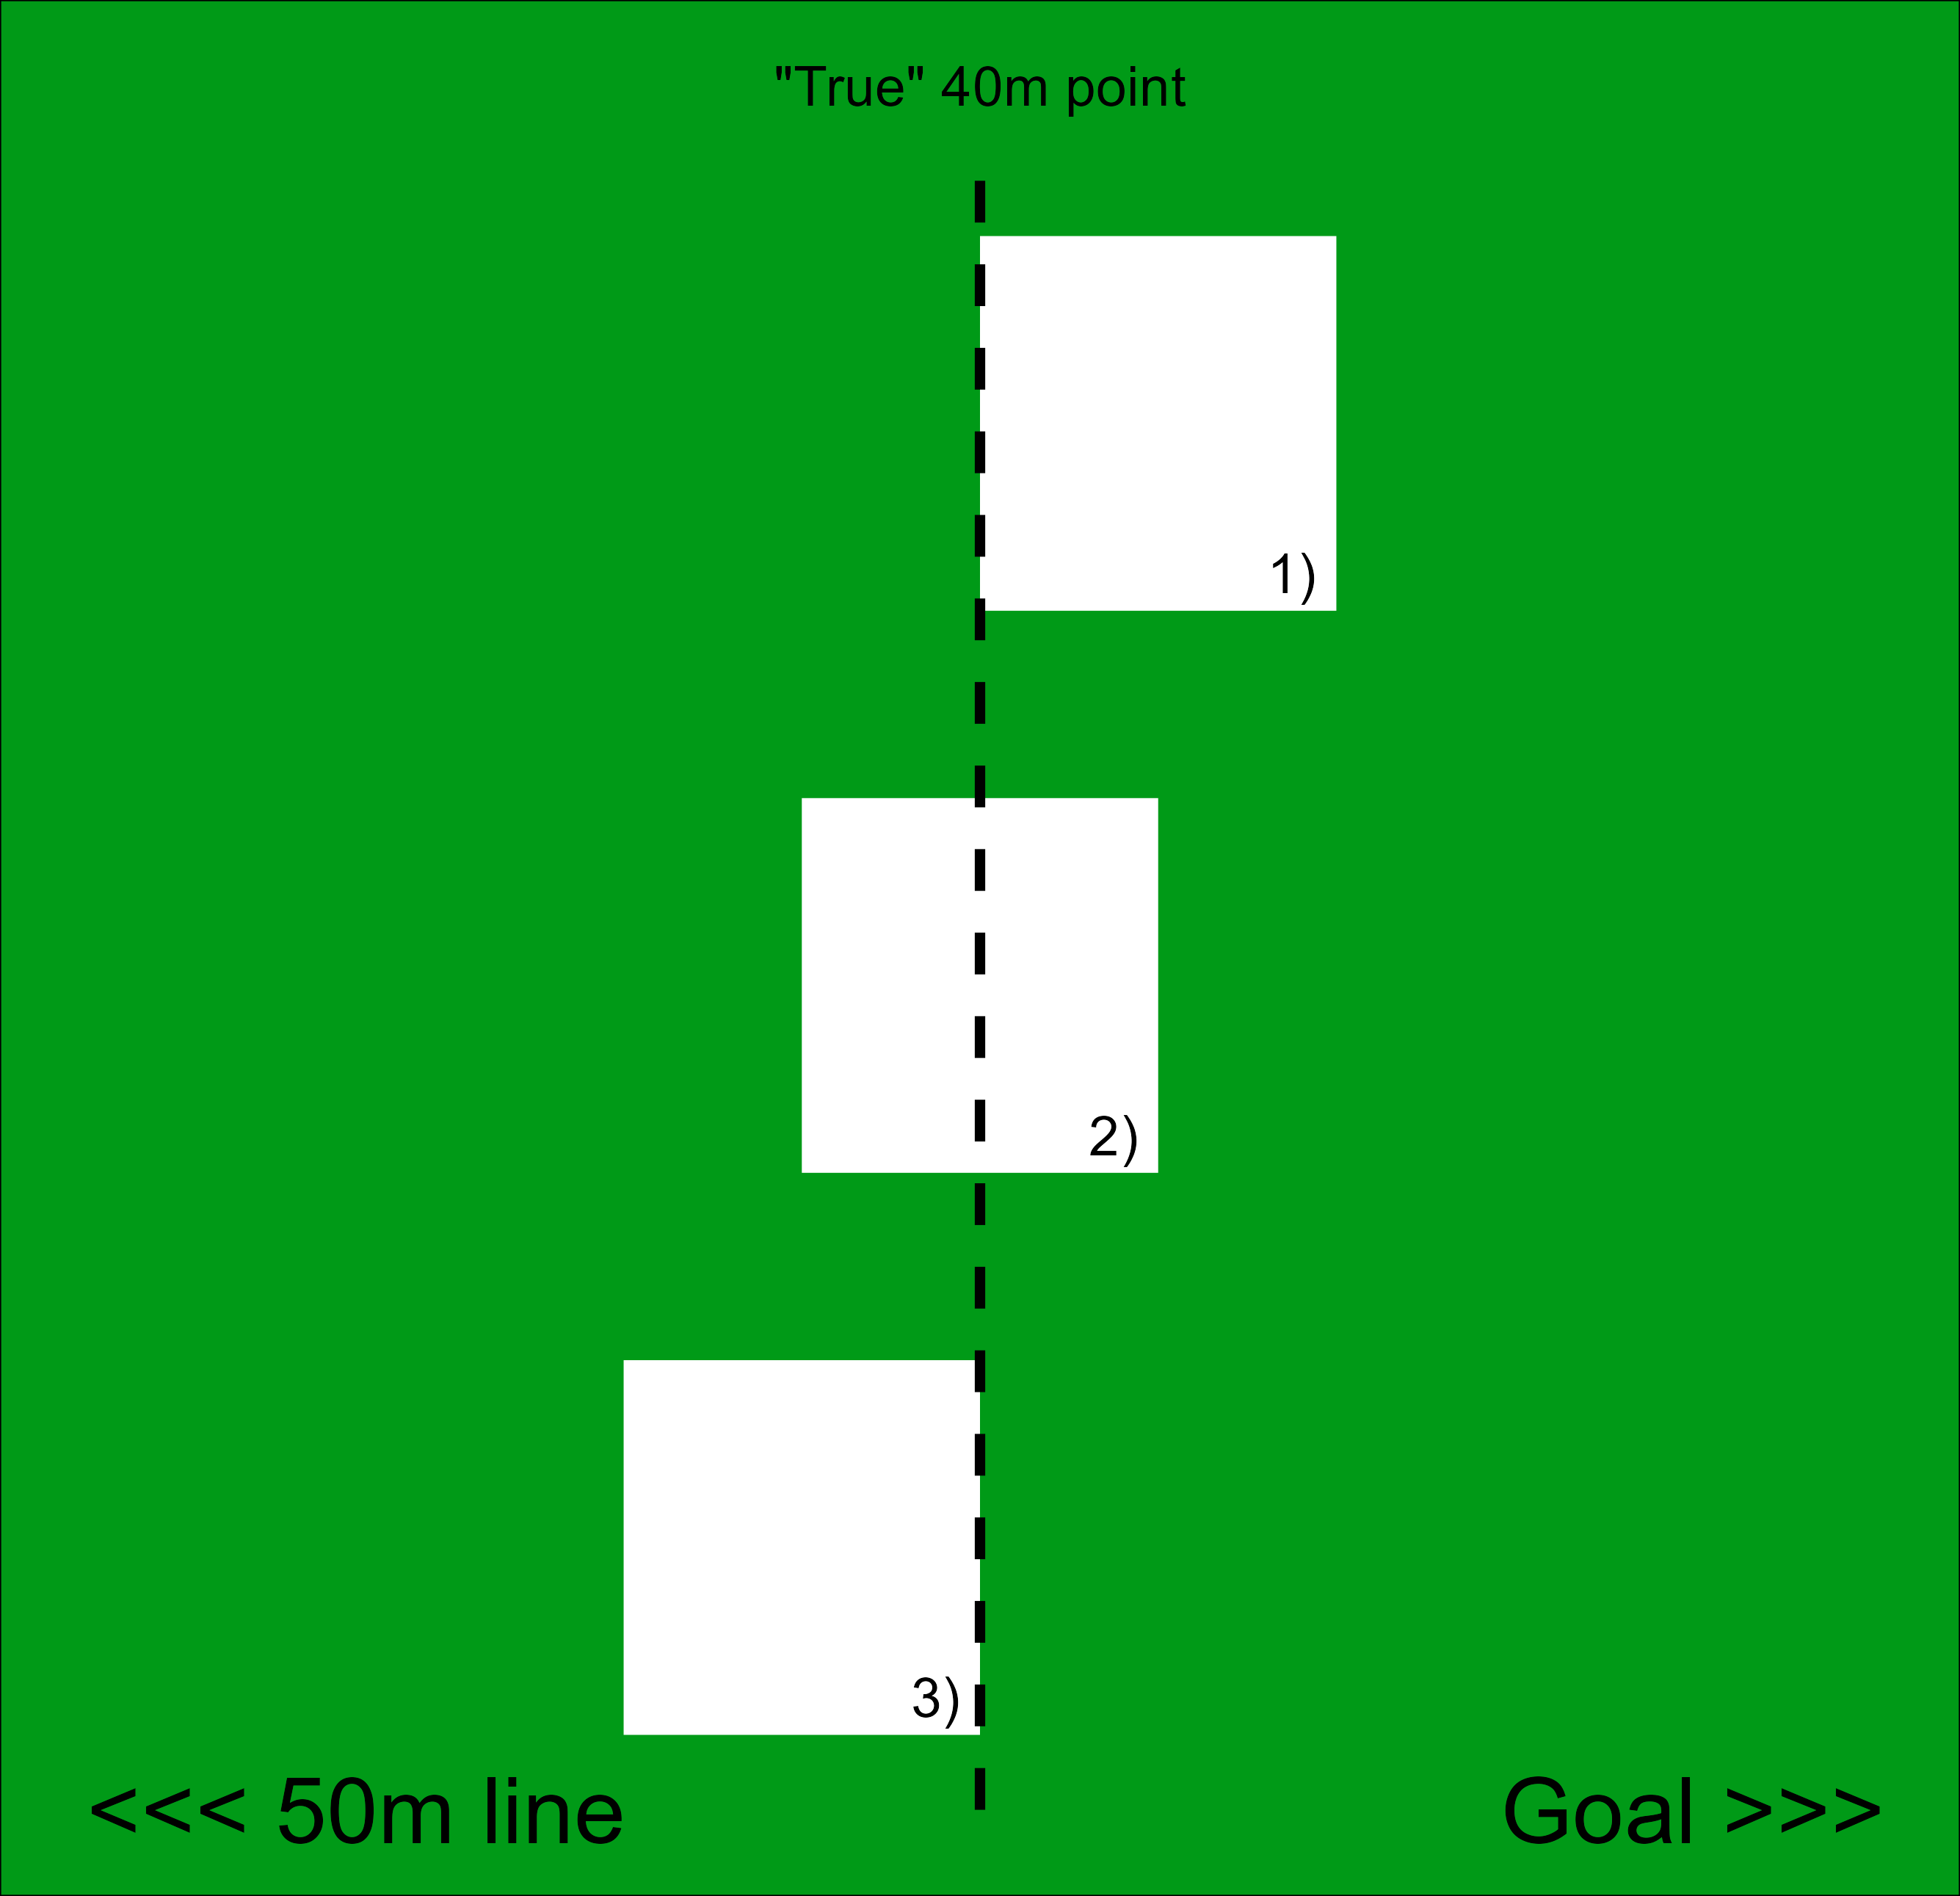
From a first quick glance, option 2 is what we did at the 50m line, right? Surely it would make sense to continue that method all the way down the field? I agree, it ensures consistent distances to all field of play lines. However, it’s actually the most unintuitive to talk about. You can’t easily say that a team is “inside the 20” without knowing exactly where the centre of the line is.
Ok, so not option 2? Let’s look at option 1 next then. In option 1:
while in attacking half, crossing a line at all means you’re in that particular region (say the defensive 20)
while in defensive half, crossing a line fully means you’re out of that particular region
The attacking behaviour in particular makes it feel very consistent for try scoring; that grounding a ball on the try line to even the smallest extent means you’ve scored a try. The defensive behaviour is a little less intuitive but does check out for cases like dropouts on the 20m line, where you’d expect the team to begin on the very edge of the line, narrowly avoiding being called offside.
But what about the 40/20 kicks? Kicker’s feet are expected to be behind the whole of the 40m line. That surely implies that behind the 40m line is exactly 40 metres. So surely option 3 can help us out there…
Option 3 is an inversed option 1:
while in attacking half, crossing a line fully means you’re in that particular region (say the defensive 20)
while in defensive half, crossing a line at all means you’re out of that particular region
So, this works with the logic of 40/20 kicks. But this falls apart with dropouts from the 20; we surely can’t allow teams to be kicking from just beyond the actual 20m mark. Something just doesn’t sit right with that.
What now? All our options have flaws. So, I turned to the rulebook to see if I could pick up any hints.
A dropout means a drop kick from the centre of the goal line or from the centre of the 20m line when bringing the ball back into play.
~ Australian Rugby League Laws and Rules of the Game
So, it looks like the rulebook plays by Option 2. And maybe it is the best option after all. It might not offer the exactness of a contrast between grass and paint that we look for in the act of try-scoring, but it’s also true that it these lines don’t matter as much as the touch and try lines.
As mentioned, option 2 is the only consistent option; it’s symmetrical across the entirety of the field of play, and that arguably is more important than being able to measure exact distances with your eyes. Additionally, referees have a slightly easier job getting teams onside and not having to remember minor distance changes in different parts of the field.
Let’s (finally) plot these on our field:

Step 5: Add the finishing touches
This field needs some vertical lines for 10m and 20m distances to the touchline (we will not be discussing the 3 options here), some posts and corner posts. Let’s add those:
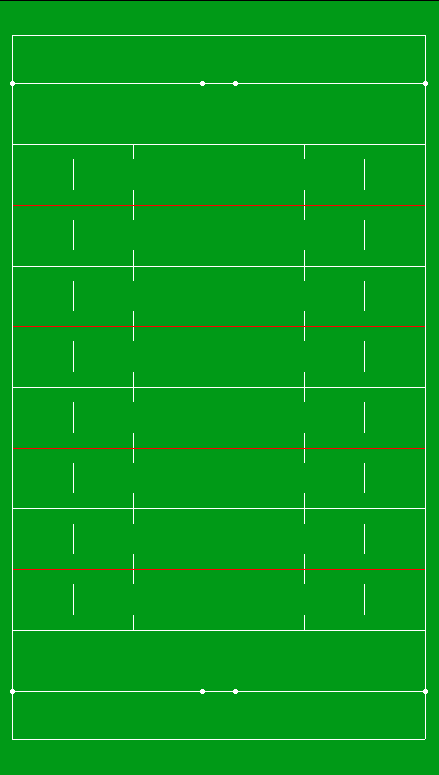
Looks good!
An unanswered question
So, when kickers attempt a 40/20, they have to have their feet behind the 40m line and have the ball first bounce before crossing the touchline within the 20m zone.
But how is the 20m zone defined? (flashback warning)
Is it option 1, 2 or 3 style?
I couldn’t find any documentation that says how it is ruled at these cases, please do refer me to it! Option 1 style, which would be ruling that the line itself is part of the 20m zone makes the most sense. It means that the theoretical minimum forward distance for a 40/20 kick is exactly 40 metres.
Nomenclature
This option 1, 2 and 3 naming convention is probably little irritating if you’re not me writing this article, but I couldn’t seem to think of anything that better describes each. If you have an idea, let me know!
Ending note
A line is about 15cm wide. I thought I might lose some viewers to anger if I had mentioned that earlier. But congratulations, you just read about 15cm portions of a 110m long field. I hope you enjoyed it.
And turns out, it was as straightforward as I thought after all.